Step 1: Determine what size your knot will be. This might just be the hardest part of tying a turks head around something. You need to make sure you have enough Bights (the bends at the top and bottom of the knot) to go around whatever you are tying your knot around. Too few and your knot will look stretched out (elongated), Too many and you will not be able to tighten it down to fit the object correctly. Most of the time it takes trial and error to find the best fit, though you can narrow it down by tying a few smaller test knots first. Different types of line tighten down differently in a turks head knot. Soft line will tend to "shrink up" and not cover as well as a stiffer line would.
Step 2: You will need to determine how long your knot will be, or the number of Leads your knot will be. The more leads you have, the longer your knot will be.
Step 3: Now that you know how many Bights and Leads you will need to make the knot the size you want, you will need to know if the combination will work in a turks head. Use the chart below to see if your knot can be tied or not.
Example 1: You determined you will need a knot with 6 Bights and 9 Leads, on the chart you find the number 6 at the top and follow it down to the number 9 on the side where you find an X. An X means you cannot tie this knot, you will need to add or remove a Bight or Lead from your knot.
Example 2: You determined you will need a knot with 5 Bights and 8 Leads, on the chart you find the number 5 at the top and follow it down to the number 8 on the side where you find an O. An O means you can tie this knot.
| Turks Head Chart | ||||||||||||||||||||||||
|---|---|---|---|---|---|---|---|---|---|---|---|---|---|---|---|---|---|---|---|---|---|---|---|---|
| TJ | 2 | 3 | 4 | 5 | 6 | 7 | 8 | 9 | 10 | 11 | 12 | 13 | 14 | 15 | 16 | 17 | 18 | 19 | 20 | 21 | 22 | 23 | 24 | 25 |
| 2 | X | O | X | O | X | O | X | O | X | O | X | O | X | O | X | O | X | O | X | O | X | O | X | O |
| 3 | O | X | O | O | X | O | O | X | O | O | X | O | O | X | O | O | X | O | O | X | O | O | X | O |
| 4 | X | O | X | O | X | O | X | O | X | O | X | O | X | O | X | O | X | O | X | O | X | O | X | O |
| 5 | O | O | O | X | O | O | O | O | X | O | O | O | O | O | O | O | O | O | X | O | O | O | O | X |
| 6 | X | X | X | O | X | O | X | X | X | O | X | O | X | X | X | O | X | O | X | X | X | O | X | O |
| 7 | O | O | O | O | O | X | O | O | O | O | O | O | X | O | O | O | O | O | O | X | O | O | O | O |
| 8 | X | O | X | O | X | O | X | O | X | O | X | O | X | O | X | O | X | O | X | O | X | O | X | O |
| 9 | O | X | O | O | X | O | O | X | O | O | X | O | O | X | O | O | X | O | O | X | O | O | X | O |
| 10 | X | O | X | X | X | O | X | O | X | O | X | O | X | X | X | O | X | O | X | O | X | O | X | X |
| 11 | O | O | O | O | O | O | O | O | O | X | O | O | O | O | O | O | O | O | O | O | X | O | O | O |
| 12 | X | X | X | O | X | O | X | X | X | X | X | O | X | X | X | O | X | O | X | X | X | O | X | O |
| 13 | O | O | O | O | O | O | O | O | O | O | O | X | O | O | O | O | O | O | O | O | O | O | O | O |
| 14 | X | O | X | O | X | X | X | O | X | O | O | X | O | O | X | O | X | O | X | X | X | O | X | O |
| 15 | O | X | O | X | X | O | O | X | X | O | X | O | O | X | O | O | X | O | O | X | O | O | X | X |
| 16 | X | O | X | O | X | O | X | O | X | O | X | O | X | O | X | O | X | O | X | O | X | O | X | O |
| 17 | O | O | O | O | O | O | O | O | O | O | O | O | O | O | O | X | O | O | O | O | X | O | O | O |
| 18 | X | X | X | O | X | O | X | X | X | O | X | O | X | X | X | O | X | O | X | X | X | O | X | O |
| 19 | O | O | O | O | O | O | O | O | O | O | O | O | O | O | O | O | O | X | O | O | O | O | O | O |
| 20 | X | O | X | X | X | O | X | O | X | O | X | O | X | X | X | O | X | O | X | O | X | O | X | X |
| 21 | O | X | O | O | X | X | O | X | O | O | X | O | X | X | O | O | X | O | O | X | O | O | X | O |
| 22 | X | O | X | O | X | O | X | O | X | X | X | O | X | O | X | O | X | O | X | O | X | O | X | O |
| 23 | O | O | O | O | O | O | O | O | O | O | O | O | O | O | O | O | O | O | O | O | O | X | O | O |
| 24 | X | X | X | O | X | O | X | X | X | O | X | O | X | X | X | O | X | O | X | X | X | O | X | O |
| 25 | O | O | O | X | O | O | O | O | X | O | O | X | O | X | O | O | O | O | X | O | O | O | O | X |
| 26 | X | O | X | O | X | O | X | O | X | O | X | X | X | O | X | O | X | O | X | O | X | O | X | O |
| 27 | O | X | O | O | X | O | O | X | O | O | X | O | O | X | O | O | X | O | O | X | O | O | X | O |
| 28 | X | O | X | O | X | X | X | O | X | O | X | O | X | O | X | O | X | O | X | X | X | O | X | O |
| 29 | O | O | O | O | O | O | O | O | O | O | O | O | O | O | O | O | O | O | O | O | O | O | O | O |
| 30 | X | X | X | X | X | O | X | X | X | O | X | O | X | X | X | O | X | O | X | X | X | O | X | X |
| 31 | O | O | O | O | O | O | O | O | O | O | O | O | O | O | O | O | O | O | O | O | O | O | O | O |
| 32 | X | O | X | O | X | O | X | O | X | O | X | O | X | O | X | O | X | O | X | O | X | O | X | O |
| 33 | O | X | O | O | X | O | O | X | O | X | X | O | O | X | O | O | X | O | O | X | X | O | X | O |
| 34 | X | O | X | O | X | O | X | O | X | O | X | O | X | O | X | X | X | O | X | O | X | O | X | O |
| 35 | O | O | O | X | O | X | O | O | X | O | O | O | X | X | O | O | O | O | X | X | O | O | O | X |
| 36 | X | X | X | O | X | O | X | X | X | O | X | O | X | X | X | O | X | O | X | X | X | O | X | O |
| 37 | O | O | O | O | O | O | O | O | O | O | O | O | O | O | O | O | O | O | O | O | O | O | O | O |
| 38 | X | O | X | O | X | O | X | O | X | O | X | O | X | O | X | O | X | X | X | O | X | O | X | O |
| 39 | O | X | O | O | X | O | O | X | O | O | X | X | O | X | O | O | X | O | O | X | O | O | X | O |
| 40 | X | O | X | X | X | O | X | O | X | O | X | O | X | X | X | O | X | O | X | O | X | O | X | X |
| 41 | O | O | O | O | O | O | O | O | O | O | O | O | O | O | O | O | O | O | O | O | O | O | O | O |
| 42 | X | X | X | O | X | X | X | X | X | O | X | O | X | X | X | O | X | O | X | X | X | O | X | O |
| 43 | O | O | O | O | O | O | O | O | O | O | O | O | O | O | O | O | O | O | O | O | O | O | O | O |
| 44 | X | O | X | O | X | O | X | O | X | X | X | O | X | O | X | O | X | O | X | O | X | O | X | O |
| 45 | O | X | O | X | X | O | O | X | X | O | X | O | O | X | O | O | X | O | X | X | O | O | X | X |
| "0" Can be tied "X" Cannot be tied | ||||||||||||||||||||||||
Step 4: Now that you know your knot can be tied, you will need to setup a pattern for your knot. I like to use a Grid pattern for most of my knots, especially the larger turks heads. It makes it easier for me to follow. On the Grid pattern below you will see Thicker lines (or Bars) at the cross points. This is what tells me if I should go over or under the crossing line
Example: Lets start with a smaller turks head, a 5 Bight by 8 Lead knot. Looking at the diagram below I've numbered the Bights and Leads for you. Print out the diagram , you may need to resize it down to a good working size, roll it into a cylinder with the Bights at the top and tape the edges together. Make sure you line it up correctly, you want the Bars from the right side of the page to overlap the thin lines on the left side. I find it easier to tape it to a wood dowel or a cardboard tube (from a roll of paper towels) so I can drive pins into it at the Bights to hold the shape of the knot while I'm working it.
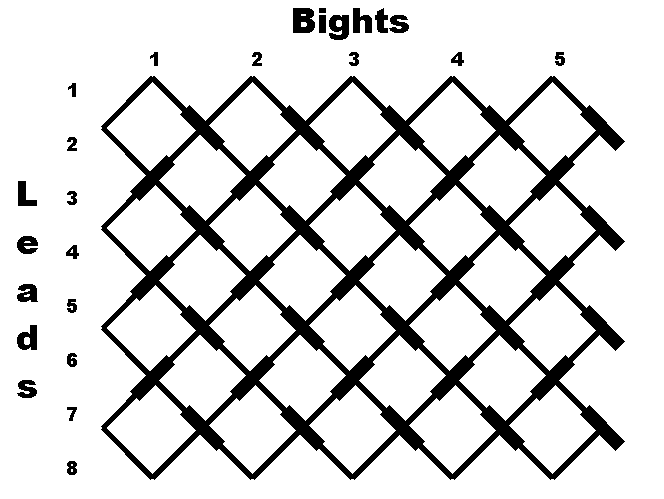
Fig 1 Shows what you should have so far. I've taped mine to a 1in wooden dowel. I drilled 1/8in holes at the Bights to hold 1/8in x 1/2in long dowels. They are just pushed into the holes, not glued, so they can be removed. You can use a cardboard tube and pins if you like. You can see I have marked some of the leads on the grid pattern. The dowel I have is about 12in long and the pattern taped to it is a 5 bight by 32 lead. You can see some of the other holes I've drilled for a 5 x 4 and a 5 x 6 knots, but I taped a piece of plain white paper over the rest of it to just show the 5 x 8 knot.
Step 5: Starting the knot. Pull out about 6ft of line from the spool, but don't cut it, you may need more line before you are finished. Its easier to feed more line through the knot than to cut a longer piece and start over, and if you have extra line when you are finished you can always feed it back as you tighten the knot down and roll it back onto your spool. Make a slipknot loop in the line at the 6ft point and place it over one of the pins. Any pin can be the starting point, at either the top or bottom of your knot. If you look at Fig 2 you see the slipknot in the lower right of the picture. I started from the bottom of this one. From your starting point follow the black line around till you come to the bight at the top of the knot, go over your pin and keep following the line till you come to a point where you are about to cross your line. If the bar at that point is going with you, go Over your line, if it is going against you, go Under your line. In Fig 2 it is against me, so I went under. Keep following it around, going over or under as the bars tell you till you come back to the point you started. You should have a knot like Fig 3. You can now remove the pins as the knot will hold it shape fairly well on its own. To Double your knot just follow your first pass, Fig 4, keeping your line beside the other. Most turks heads look best if they are Doubled or Tripled, as in Fig 5 & Fig 6, In Fig 6 I used a 2nd contrasting color, turks head knots don't have to be all one color, I like the way the two color knot looks when it is tightened down, really shows off the Over and Under pattern well. Fig 7 shows a doubled knot tightened down on a 3/4in dowel. Also in Fig 7 are a few tools I use, top is a nail set I bought from a local hardware store. I use it most of all. It works great to push a line under another, to get under a line to pull it tight, and to tuck in cut ends of a line. The other is a loop rug hook tool I picked up from a craft store. Its real handy when you need to pull a line under another and don't have much room.
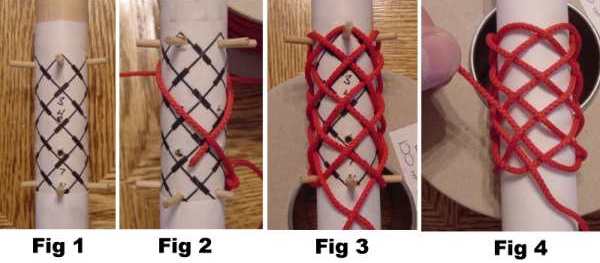
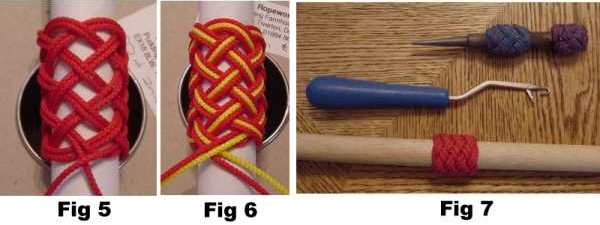
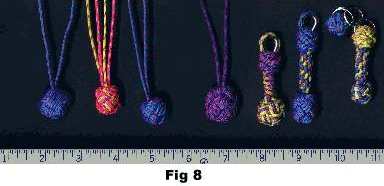
Fig 8 All except for the one on the far left
(a Monkey's fist) are turks heads of one form or another. The 3
on the right are key fobs I have made. They make great gifts
too!
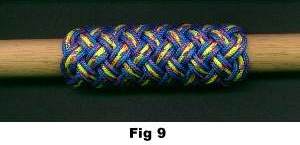
Fig 9 is a 5 x 16 2 color tripled turks
head.